Fruity Vintage Cheesecake Tacos Recipe
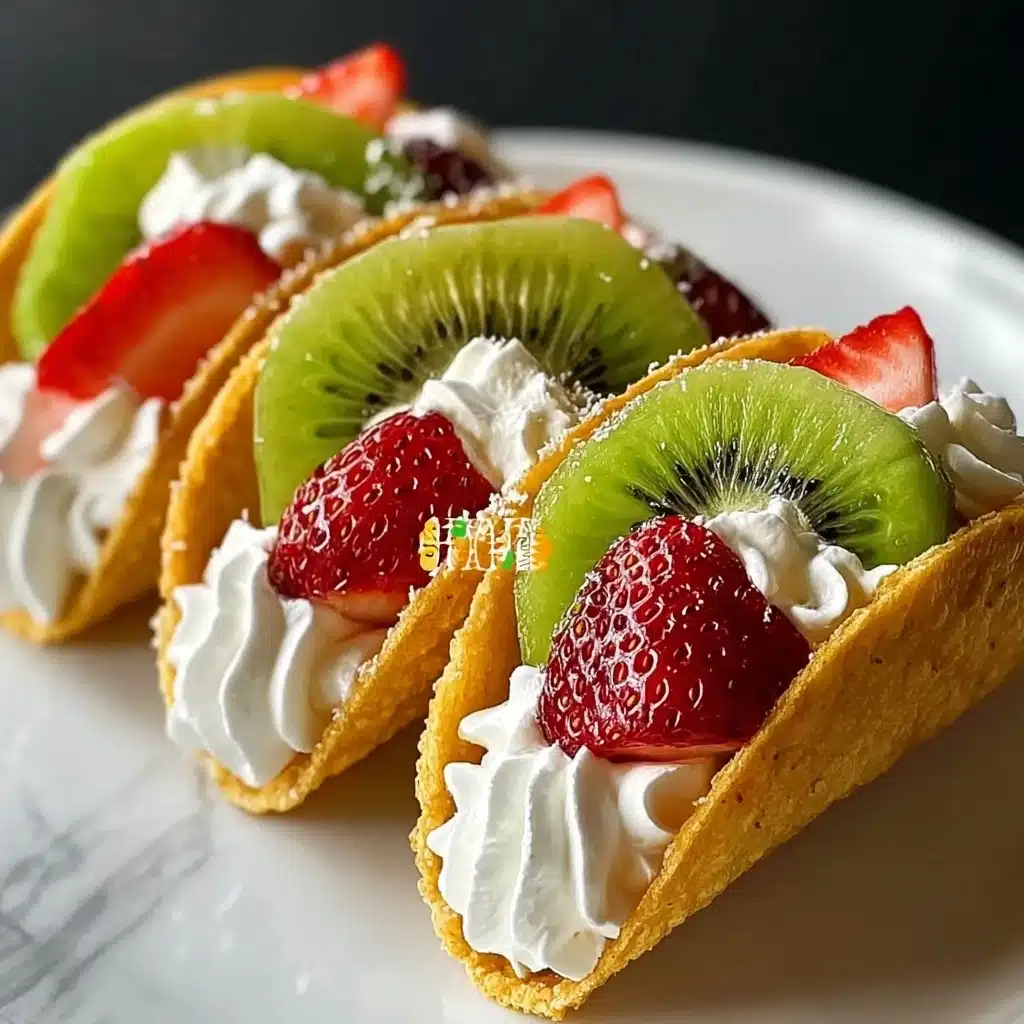
These Fruity Vintage Cheesecake Tacos are a whimsical twist on classic desserts, featuring soft, airy sponge cake “taco shells” brimming with silky cheesecake filling and crowned with fresh, vibrant fruit. The marriage of creamy, tangy filling and delicate cake shells is irresistible—each bite is a nostalgic nod to vintage tea parties and sunny brunches. Whether you’re looking to wow guests or treat yourself, Fruity Vintage Cheesecake Tacos are sure to brighten up any dessert table and deliver that perfect touch of elegance and fun.
Ingredients You’ll Need
With just a handful of pantry staples and fresh fruit, you can create these eye-catching Fruity Vintage Cheesecake Tacos in no time! Each ingredient plays a vital role, from forming the tender taco shells to providing a cloud-like filling and refreshing color on top.
- Eggs (4 large, room temperature): The backbone of the sponge cake, creating that light and airy texture.
- Granulated sugar (1/2 cup): Essential sweetness for the sponge shells and helps them brown beautifully.
- All-purpose flour (1/2 cup): Gives body to the sponge, keeping the shell tender yet sturdy enough for filling.
- Baking powder (1/2 tsp): Lends a gentle lift to the sponge for that perfect taco shape.
- Vanilla extract (2 tsp total): Adds classic flavor to both the sponge and cheesecake filling.
- Salt (1/4 tsp): Just a pinch intensifies all the other flavors.
- Cream cheese (8 oz, softened): Superstar of the filling, giving it signature richness and a slight tang.
- Powdered sugar (1/2 cup, plus more for dusting): Sweetens the filling and gives a lovely, snowy finish.
- Heavy whipping cream (1 cup): Whips up into fluffy peaks for an ultra-light cheesecake texture.
- Fresh strawberries, kiwi, mango, blueberries: The lively burst of color, flavor, and freshness that completes your Fruity Vintage Cheesecake Tacos.
How to Make Fruity Vintage Cheesecake Tacos
Step 1: Prepare the Sponge Cake Shells
Preheat your oven to 350°F (175°C), and line a baking sheet with parchment paper so nothing sticks. Using a mixer, beat your eggs and sugar together until the mixture turns pale and doubles in volume—it should look super fluffy, almost like a mousse. Gently sift in the flour, baking powder, and salt, then fold to combine. Stir in the vanilla extract, careful not to deflate all that lovely air! Spread the batter evenly onto your prepared baking sheet and bake for 8 to 10 minutes, until the cake is lightly golden and springs back when touched.
Step 2: Shape the Taco Shells
Once your cake is out of the oven and still warm, quickly use a cookie cutter or glass to cut out small circles. Working fast while the cake is pliable, drape each circle over a rolling pin (or similar rounded object) to form that classic taco shell shape. Leave them to cool and set—they’ll hold their curve while turning beautifully tender.
Step 3: Make the Cheesecake Filling
In a mixing bowl, beat the softened cream cheese, powdered sugar, and vanilla extract until totally smooth and creamy. In a separate chilled bowl, whip your heavy cream until you see stiff peaks. Gently fold the whipped cream into the cream cheese mixture—this approach makes the filling impossibly light and luscious, perfect for spooning into your vintage taco shells.
Step 4: Assemble Your Fruity Vintage Cheesecake Tacos
Fill each cooled sponge shell generously with the cheesecake filling, using either a piping bag for neatness or a spoon for a rustic look. Top with an abundance of colorful fruit—sliced strawberries, kiwi, mango, and bursts of blueberries. For that extra vintage vibe, dust with a graceful sprinkle of powdered sugar. Chill the tacos for 10-15 minutes to let the flavors meld and the filling set.
How to Serve Fruity Vintage Cheesecake Tacos
Garnishes
A snowy dusting of powdered sugar not only looks beautiful but also adds a delicate sweetness on top. If you want to add some sparkle, a few micro mint leaves or some edible flowers tucked among the fruit go a long way in making these Fruity Vintage Cheesecake Tacos absolutely enchanting.
Side Dishes
Serve alongside a pot of floral tea or a refreshing citrusy mocktail to complement the creamy filling and succulent fruit. For something truly memorable, pair these tacos with a bright fruit salad or extra dollops of whipped cream for guests to add as they wish.
Creative Ways to Present
Display your Fruity Vintage Cheesecake Tacos standing up in a decorative taco rack, nestled amongst fresh berries for an elegant party centerpiece. Or, let guests build their own tacos by setting out bowls of fruit and a piping bag of cheesecake filling—the interactive experience makes dessert even more fun!
Make Ahead and Storage
Storing Leftovers
If you have any Fruity Vintage Cheesecake Tacos left over (which might be a rarity!), store them in an airtight container in the refrigerator. The cake shells will remain soft, and the filling stays delightfully creamy for up to two days—just note the fruit is freshest on day one.
Freezing
While the cheesecake filling and cake shells can be frozen separately, it’s best not to freeze assembled tacos with fruit, as berries and tropical fruit tend to become mushy when thawed. Freeze unfilled shells and filling for up to a month, then thaw and assemble fresh for best results.
Reheating
No need to reheat—the beauty of Fruity Vintage Cheesecake Tacos is that they’re served chilled! Simply let the shells or filling come to room temperature (if previously frozen), then fill, garnish, and enjoy.
FAQs
Can I use other fruits in my Fruity Vintage Cheesecake Tacos?
Absolutely! Any fresh fruit you love works well here—try raspberries, peaches, or even pomegranate seeds for different flavor twists and color pops.
What if I don’t have a rolling pin to shape the tacos?
No worries at all! You can use anything cylinder-shaped, like a clean bottle or a wooden spoon handle, to drape the cake circles and form taco shells.
Can I make the sponge cake shells gluten-free?
Yes! Just swap the all-purpose flour for your favorite 1:1 gluten-free flour blend—the cakes will still bake up wonderfully soft and pliable.
How do I keep the cake shells from cracking?
Shape the shells while they’re still warm and pliable, right after baking. If the cake cools down, it will set and be more likely to split, so timing is key!
Will Fruity Vintage Cheesecake Tacos hold up for a party?
Yes, they do! For the best texture, assemble shortly before serving and chill them for a bit—the sponge and filling will stay perfect for a few hours, and they’re sure to steal the show at your gathering.
Final Thoughts
Give these Fruity Vintage Cheesecake Tacos a whirl—your taste buds will thank you! From their playful presentation to the heavenly flavors, they’re guaranteed to spark joy every time. Gather your favorite fruits, whip up that dreamy filling, and treat friends or family to something truly special and memorable.
PrintFruity Vintage Cheesecake Tacos Recipe

These Fruity Vintage Cheesecake Tacos feature light and airy sponge cake shells filled with a creamy cheesecake mixture and topped with fresh fruit. The delicate texture of the cake combined with the richness of the filling makes this dessert both elegant and delicious—perfect for tea parties, brunch, or special occasions!
- Prep Time: 15 minutes
- Cook Time: 10 minutes
- Total Time: 25 minutes
- Yield: 6–8 cheesecake tacos 1x
- Category: Dessert
- Method: Baking
- Cuisine: Fusion
- Diet: Vegetarian
Ingredients
For the Sponge Cake Shells:
- 4 large eggs (room temperature)
- 1/2 cup granulated sugar
- 1/2 cup all-purpose flour
- 1/2 tsp baking powder
- 1 tsp vanilla extract
- 1/4 tsp salt
For the Cheesecake Filling:
- 8 oz cream cheese (softened)
- 1/2 cup powdered sugar
- 1 tsp vanilla extract
- 1 cup heavy whipping cream
For the Fruity Toppings:
- Fresh strawberries (sliced)
- Kiwi slices
- Mango slices
- Blueberries
- Powdered sugar (for dusting)
Instructions
- Make the Sponge Cake Shells: Preheat Oven to 350°F (175°C) and line a baking sheet with parchment paper. Beat eggs and sugar until pale and fluffy. Sift in dry ingredients and fold gently. Bake for 8-10 minutes, then shape into taco shells.
- Prepare the Cheesecake Filling: Beat cream cheese, powdered sugar, and vanilla until smooth. Whip heavy cream separately until stiff peaks form. Fold whipped cream into cream cheese mixture.
- Assemble the Fruity Tacos: Fill sponge cake shells with cheesecake filling, top with fruits, and dust with powdered sugar. Chill for 10-15 minutes before serving.
Notes
- Chill the assembled tacos before serving for best results.
Nutrition
- Serving Size: 1 cheesecake taco
- Calories: Approx. 280 kcal
- Sugar: Approx. 15g
- Sodium: Approx. 180mg
- Fat: Approx. 20g
- Saturated Fat: Approx. 12g
- Unsaturated Fat: Approx. 6g
- Trans Fat: 0g
- Carbohydrates: Approx. 22g
- Fiber: Approx. 1g
- Protein: Approx. 4g
- Cholesterol: Approx. 90mg
Keywords: Cheesecake Tacos, Fruity Dessert, Vintage Recipe