Classic Italian Tiramisù Recipe
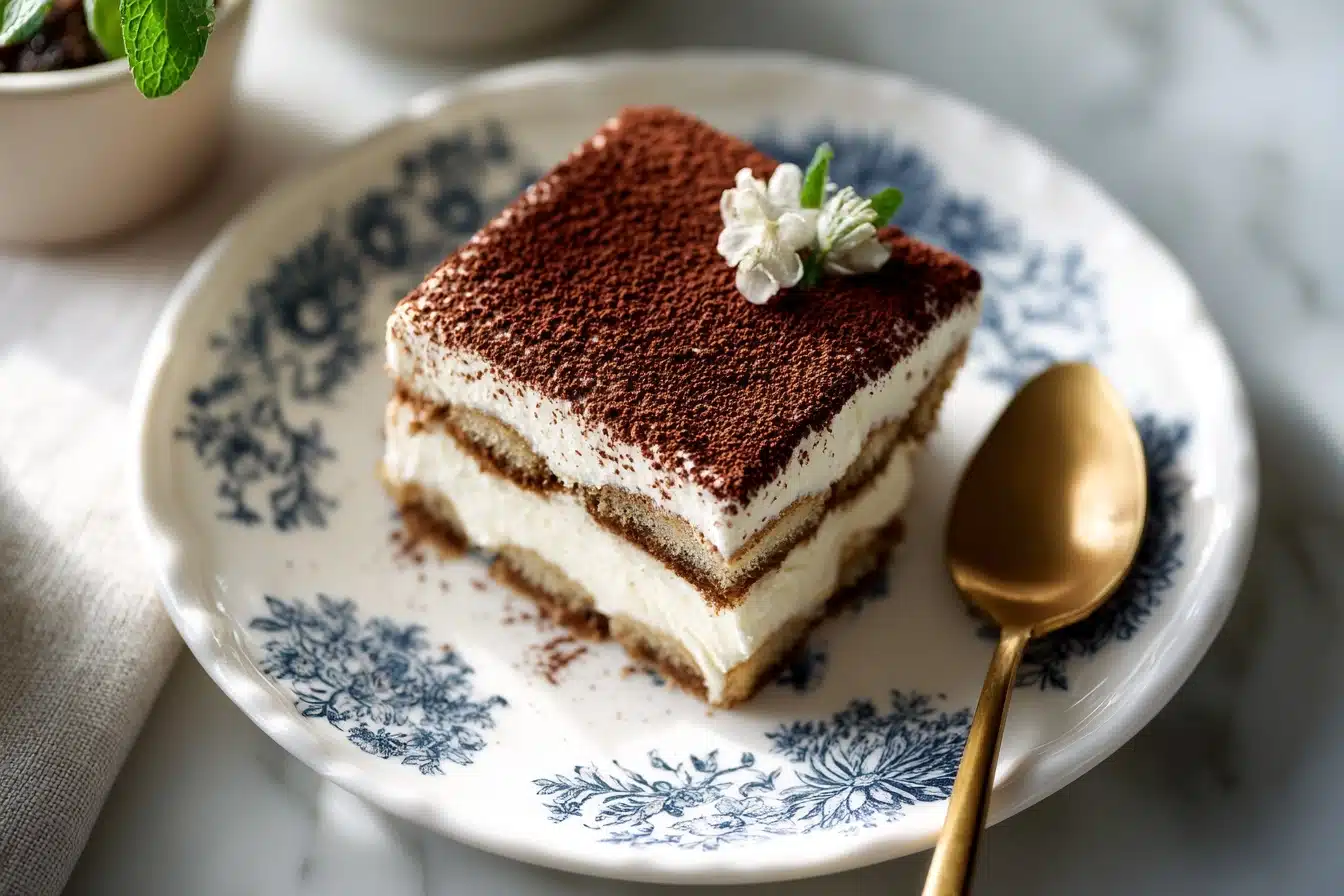
Classic Italian Tiramisù is the ultimate Italian dessert, marrying delicately espresso-soaked ladyfingers with layers of airy mascarpone cream, all finished with a generous dusting of deep, bittersweet cocoa. Each spoonful delivers a harmonious balance of coffee, creamy richness, and just a whisper of sweetness, making it a legendary treat for any occasion. This is the kind of showstopper that transports you straight to a bustling Roman café with the very first bite—perfect for dinner parties, holidays, or whenever you want to share something truly special.
Ingredients You’ll Need

Ingredients You’ll Need
One of the reasons Classic Italian Tiramisù holds such a treasured spot in hearts (and tastebuds!) around the world is its simplicity. Each ingredient brings a unique personality, contributing to the flavor, texture, and unmistakably elegant appearance that makes this dish unforgettable.
- Egg Yolks: The foundation of the creamy custard, giving it incredible richness and silkiness.
- Granulated Sugar: Sweetens and helps the yolks achieve that gorgeous pale, thick consistency.
- Heavy Cream: Adds lightness, fluff, and that signature cloud-like mouthfeel.
- Mascarpone Cheese (room temperature): Essential for authentic tiramisù, this Italian cheese lends a mild, buttery flavor and velvety texture.
- Strong Brewed Espresso or Coffee (cooled): Imbues each ladyfinger with bold, aromatic flavor—don’t skip the cooling step to avoid soggy cookies.
- Coffee Liqueur (optional): A splash adds a sophisticated grown-up twist—totally optional but highly recommended for depth.
- Ladyfinger Cookies (savoiardi): The backbone of the dessert, these crisp cookies transform into soft, espresso-infused layers.
- Unsweetened Cocoa Powder: A final dusting for elegant contrast and a rich chocolate finish that’s simply irresistible.
How to Make Classic Italian Tiramisù
Step 1: Create the Luscious Egg Yolk Mixture
Start by combining egg yolks and sugar in a heatproof bowl. Place this over a pot of gently simmering water and whisk constantly for 8 to 10 minutes. You’ll notice the mixture lighten in color and thicken considerably—this is what gives those iconic billowy layers their structure and flavor. Once thick and pale, set the bowl aside to cool slightly before moving on.
Step 2: Whip the Cream to Perfection
In a clean bowl, whip your chilled heavy cream until stiff peaks form. This adds that wonderful lift to Classic Italian Tiramisù, ensuring the mascarpone filling is fluffy rather than dense. A hand mixer will get the job done in seconds, but doing it by hand is a nice little arm workout!
Step 3: Blend the Mascarpone Magic
When your yolk mixture is just barely warm, gently fold in the mascarpone cheese until the mixture is utterly smooth and uniform. Now, carefully fold in your whipped cream, taking care to keep as much air in the mixture as possible. This step promises a mousse-like creaminess that sets tiramisù apart.
Step 4: Dip the Ladyfingers
In a shallow dish, stir together your cooled espresso (and coffee liqueur, if using). With a gentle touch, dip each ladyfinger quickly—just a second per side is enough. The goal is for them to absorb flavor without turning mushy. Line the base of your serving dish with these coffee-soaked cookies in a snug, even layer.
Step 5: Layer the Components
Spoon half of the mascarpone mixture over your bed of ladyfingers, spreading it evenly to the edges. Add another layer of dipped cookies, followed by the rest of the mascarpone cream. The result is a beautiful, creamy mosaic that’s almost too pretty to cover.
Step 6: Chill to Perfection
Smooth the surface, cover your dish, and refrigerate for at least six hours—overnight is ideal if you can resist sneaking a bite. This waiting period allows the flavors to meld together, the cookies to soften just right, and the dessert to set into those quintessential, clean layers.
Step 7: Final Flourish and Serve
Right before serving, dust the top with a generous layer of unsweetened cocoa powder. The cocoa’s slight bitterness balances the creaminess, crowning your Classic Italian Tiramisù with an unmistakably sophisticated flair. Slice, serve, and prepare for applause!
How to Serve Classic Italian Tiramisù
Garnishes
The timeless way to finish Classic Italian Tiramisù is a snowfall of high-quality unsweetened cocoa powder—simple yet striking. For a little extra elegance, add a shower of delicate chocolate shavings, a few chocolate-covered espresso beans, or even a touch of orange zest for a playful citrusy note. It’s all about the final little touches that make each serving feel like a celebration.
Side Dishes
Because Tiramisù is so luxurious, it really shines as the centerpiece. If you want a little accompaniment, consider serving it with fresh berries (like raspberries or strawberries) for brightness, or a shot of chilled espresso to echo the dessert’s signature flavors. For a festive dinner, a crisp glass of Prosecco or Moscato pairs beautifully!
Creative Ways to Present
You can give your Classic Italian Tiramisù a modern spin by assembling it in individual glasses or small jars for easy, elegant serving at parties. Layer it into a trifle bowl for maximum visual drama, or use cookie cutters to create tiramisù squares for a plated dessert that’s party-ready. However you present it, those iconic creamy layers are always a showstopper.
Make Ahead and Storage
Storing Leftovers
Store any leftover Classic Italian Tiramisù covered in the refrigerator—it holds up beautifully for up to three days. In fact, letting it sit overnight deepens the flavors and keeps the texture flawless. Just make sure it’s well-wrapped or in an airtight container to prevent absorbing any fridge odors.
Freezing
You can freeze Classic Italian Tiramisù with good results! Wrap it tightly (or store in a covered freezer-safe container), and it will keep for up to two months. Defrost in the fridge overnight before serving, and give it a fresh dusting of cocoa powder to refresh its look and flavor.
Reheating
While tiramisù is meant to be served chilled, if you’ve frozen leftovers, simply thaw them in the fridge rather than at room temperature. There’s no need to reheat—just let it gently come back to its creamy, luxurious self. Avoid microwaving, as it can make the mascarpone cream separate and the ladyfingers mushy.
FAQs
Can I make Classic Italian Tiramisù without coffee liqueur?
Absolutely! The coffee liqueur adds a subtle depth and a little extra “wow” factor, but your tiramisù will still be wonderfully flavorful if you skip it. Just use espresso or strong brewed coffee for soaking the ladyfingers.
How do I prevent the ladyfingers from getting soggy?
The trick is to dip your ladyfingers quickly—just a second or so on each side in the coffee. They’re like little sponges and will soak up the espresso fast, so a brief dunk is all you need for perfect texture.
Is it safe to eat desserts with uncooked eggs?
Traditional tiramisù uses a gentle double-boiler method to cook the yolks and sugar together, which makes them food safe. Make sure to follow this step for peace of mind.
Can I use cream cheese instead of mascarpone?
Mascarpone is classic for a reason—it’s lighter and silkier than cream cheese, and gives Classic Italian Tiramisù its authentic flavor. If you must substitute, use the full-fat kind and expect a richer, slightly tangier taste.
What’s the best way to transport tiramisù for a party?
Build your tiramisù in a deep, lidded dish that travels well, and wait to dust with cocoa until you arrive. Chill it thoroughly before you set off so it stays set and gorgeous for your big reveal.
Final Thoughts
If you’ve been searching for a sure-to-impress dessert, look no further than Classic Italian Tiramisù. It’s a timeless treat that everyone loves, with flavors and textures that only get better as they mingle. Don’t wait for a holiday—whip this up the next time you want to treat yourself or someone special to a little Italian magic!
PrintClassic Italian Tiramisù Recipe
Classic Italian Tiramisù is an elegant layered dessert of espresso-soaked ladyfingers and velvety mascarpone cream, dusted with rich cocoa powder for the ultimate Italian indulgence.
- Prep Time: 25 minutes
- Total Time: 6 hours 25 minutes
- Yield: 9 slices 1x
- Category: Dessert
- Method: Chilling
- Cuisine: Italian
- Diet: Vegetarian
Ingredients
Egg Yolk Mixture:
- 6 large egg yolks
- 3/4 cup granulated sugar
Mascarpone Cream:
- 1 cup heavy cream
- 1 cup mascarpone cheese (room temperature)
Other Ingredients:
- 2 cups strong brewed espresso or coffee (cooled)
- 1/4 cup coffee liqueur (optional)
- 1 package ladyfinger cookies (savoiardi)
- Unsweetened cocoa powder, for dusting
Instructions
- Egg Yolk Mixture: In a heatproof bowl, whisk egg yolks and sugar over a pot of simmering water (double boiler method) for 8–10 minutes, until thick and pale. Let cool slightly.
- Mascarpone Cream: In a separate bowl, whip heavy cream to stiff peaks. Gently fold mascarpone into the cooled yolk mixture until smooth. Then fold in the whipped cream.
- Assembly: In a shallow dish, combine espresso and liqueur (if using). Dip each ladyfinger briefly into the mixture, turning quickly to avoid sogginess. Layer soaked ladyfingers into the bottom of a rectangular dish. Spread half the mascarpone mixture over the ladyfingers. Repeat with another layer of dipped ladyfingers, then top with remaining cream. Smooth the top and cover. Refrigerate at least 6 hours, preferably overnight.
- Final Touch: Dust generously with unsweetened cocoa powder before slicing and serving.
Nutrition
- Serving Size: 1 slice
- Calories: 320 kcal
Keywords: italiandessert, tiramisu, mascarponedessert, coffeeinfused, elegantlayercake, classiccakes, dessertrecipe, espressoflavors, italianclassic, ladyfingers, homemadedesserts, nobakedesserts, velvetymousse, sweetlayers, coffeetreat, creamdesserts, italianbaking, celebrationdesserts, cocoapowderfinish, dinnerpartydessert


