Boba Milk Tea Mochi Recipe
Get ready for an irresistible treat—Boba Milk Tea Mochi is here to satisfy your sweet tooth and bubble tea cravings all in one adventurous bite! Think chewy mochi shells swaddled around a dreamy milk tea cream, finished with a burst of bouncy boba pearls in the center, all dusted with cocoa for an elegant finish. Each bite is pure magic, blending the nostalgia of Japanese mochi desserts with the trendy flavors of your favorite boba shop. Whether you’re whipping these up for a gathering or keeping them all to yourself (no judgment!), this dessert mash-up guarantees smiles, surprises, and lots of joy.

Ingredients You’ll Need
You’ll be amazed by how a handful of simple ingredients come together to create such a playful and memorable dessert. Every element here plays a special role—building that signature chew, the creamy fill, and the pop of boba you’ll love. Let’s break down what makes each so important:
- Glutinous rice flour (mochiko): The star behind that iconic mochi chewiness. Don’t substitute with regular rice flour or you’ll miss the signature texture!
- Cocoa powder (for dusting): Adds a gently bitter, rich finish and keeps the mochi from sticking to everything.
- Water: Blends with the rice flour and sugar to form the stretchy mochi dough.
- Sugar: Sweetens up the shell, letting the other flavors harmonize inside.
- Milk (dairy or non-dairy): Makes the milk tea filling smooth and rich. Try oat, almond, or soy for a dairy-free twist!
- Black tea leaves (or tea bag): Infuses that full-bodied, robust tea flavor that defines true Boba Milk Tea Mochi.
- Sweetened condensed milk: Thickens and sweetens the filling, giving it irresistible creaminess.
- Cooked tapioca pearls: The essential boba! They add fun chew and burst with flavor in every bite.
- Brown sugar or honey: Gives the pearls their glossy, syrupy coating—you’ll want a spoonful just for yourself!
How to Make Boba Milk Tea Mochi
Step 1: Prepare the Boba Pearls
Start by cooking the tapioca pearls according to the instructions on the package. Once they’re perfectly chewy (not hard in the center!), toss them immediately with brown sugar or honey. This step not only sweetens the boba, but also keeps them from sticking together and drying out while you make the other components.
Step 2: Brew and Chill the Milk Tea Filling
For that signature milk tea flavor, brew strong black tea using loose leaves or a sturdy tea bag. Blend the cooled tea with your milk of choice and stir in plenty of sweetened condensed milk until everything’s rich, creamy, and fragrant. Cover and let your filling chill thoroughly in the fridge—it’ll help everything set up beautifully when it comes time to fill the mochi.
Step 3: Cook the Mochi Dough
In a microwave-safe bowl, whisk together glutinous rice flour, sugar, and water until smooth and lump-free. Microwave the mixture for one minute, give it a good stir, then microwave again for another minute. You’ll end up with a thick, sticky, glossy dough that’s the perfect consistency for shaping into those pillowy mochi shells.
Step 4: Shape the Mochi Shells
Generously dust your work surface with cocoa powder—don’t be afraid to go heavy, as this stops the sticky mochi from clinging to your hands and the countertop! Scrape the dough out, then flatten it gently with your hands or a rolling pin until it’s about a quarter-inch thick. Use a round cutter to stamp out eight circles; these will be the soft wrappers for your Boba Milk Tea Mochi.
Step 5: Fill and Seal the Mochi
Spoon a bit of the chilled milk tea filling into the center of each mochi circle, then add three to four sweet boba pearls. Carefully lift and pinch the edges together at the top, sealing everything tightly inside. Take your time—patience here means beautifully round, leak-free mochi that’s bursting with flavor!
Step 6: Dust and Chill
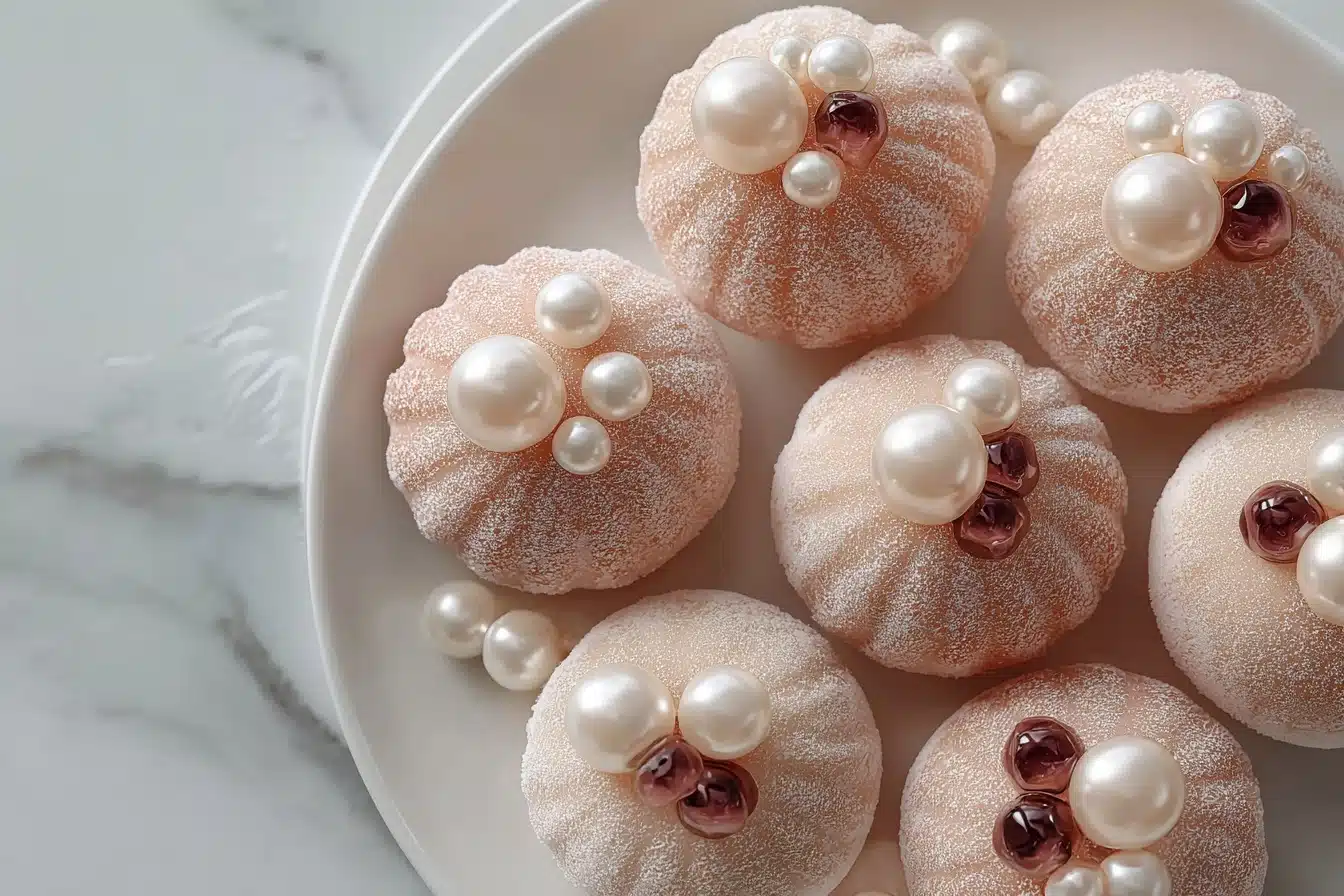
Once all your Boba Milk Tea Mochi balls are sealed, gently roll them in more cocoa powder for a rich, bakery-style finish. Pop them in the fridge for at least 30 minutes to help everything firm up. This short chill time gives you perfectly chewy, tender mochi and keeps the milk tea filling cool and luscious.
How to Serve Boba Milk Tea Mochi
Garnishes
A simple dusting of cocoa powder is completely classic, but you can also experiment with a sprinkle of powdered sugar or a few extra boba pearls on top for extra drama. For a more elegant touch, add a little swirl of whipped cream or a few fresh mint leaves on the serving plate. The goal is to accentuate the playful vibes while giving your guests something truly Instagrammable.
Side Dishes
These mochi treats are perfect with a fresh pot of jasmine or oolong tea, a lightly sweetened matcha latte, or crisp fruit slices for a refreshing counterpoint. If you want a bigger spread, pair them alongside other Asian-inspired desserts like tang yuan, dorayaki, or fluffy steamed sponge cakes for a dazzling dessert table.
Creative Ways to Present
Arrange your Boba Milk Tea Mochi in cupcake liners for a party-ready look, skewer them with cute toothpicks for a pass-around treat, or nestle each one in a pretty box for gift giving. Stacking them on a tiered platter or serving with tiny cups of extra milk tea on the side transforms them from a snack into a showstopping dessert centerpiece!
Make Ahead and Storage
Storing Leftovers
Place any leftover Boba Milk Tea Mochi in a single layer inside an airtight container—separating with parchment if you stack to prevent sticking. Store in the refrigerator for up to two days. The texture is best on the day they’re made, but a quick rest at room temperature before serving brings back the perfect chew.
Freezing
Boba Milk Tea Mochi can be frozen for longer storage! Arrange them on a tray until solid, then transfer to a zip-top freezer bag with parchment between layers. Thaw in the refrigerator overnight when you’re ready to eat. Just note that the boba may lose some chewiness after freezing, so fresh is always best if you can.
Reheating
Mochi is meant to be enjoyed chilled or at room temperature, so no reheating required! If you pulled them from the fridge, simply let the mochi sit out for 10 to 15 minutes to soften and become extra pillowy before serving. Resist microwaving—the filling may melt and ooze out, which we definitely want to avoid!
FAQs
Can I make Boba Milk Tea Mochi without a microwave?
Absolutely! You can steam the mochi dough in a heatproof bowl set over boiling water for about 10–12 minutes, stirring once or twice for even cooking. The microwave just speeds things up!
What if I can’t find glutinous rice flour?
Glutinous rice flour (sometimes called mochiko) is essential for the signature chewy texture—regular rice flour just won’t work the same magic. Look for it at Asian grocery stores or order it online for best results.
Can I use store-bought boba pearls?
Yes! Quick-cooking or instant boba pearls make this recipe even faster and just as fun. Just be sure to toss them in brown sugar or honey after cooking for that irresistible, glossy finish.
What’s the best way to store Boba Milk Tea Mochi if I want to gift them?
Let the mochi chill fully and set completely before packaging them in individual paper liners inside a pretty gift box. A small ice pack helps keep them fresh if you’re transporting in warm weather!
Can I flavor the milk tea filling with other teas?
Definitely! Try earl grey for a floral twist, matcha for a green tea version, or even chai for a spiced variation. The possibilities for Boba Milk Tea Mochi are boundless—let your imagination run wild!
Final Thoughts
If you’ve never tried making Boba Milk Tea Mochi before, this is your sign to dive in—it’s unbelievably fun, endlessly customizable, and just a pure delight to eat. Whether you’re making them for friends or sneaking the last one for yourself, there’s nothing quite like the moment you bite through that chewy shell and discover the creamy milk tea and bouncy boba inside. Give it a shot and prepare to fall in love with your new favorite dessert mash-up!
PrintBoba Milk Tea Mochi Recipe
Chewy cocoa-dusted mochi filled with creamy milk tea filling and bursting with boba pearls—this trendy dessert mash-up delivers nostalgic bubble tea flavors in every bite.
- Prep Time: 15 minutes (plus chilling)
- Cook Time: 4 minutes
- Total Time: 19 minutes + chilling
- Yield: 8 mochi treats 1x
- Category: Dessert
- Method: Microwave, Refrigerate
- Cuisine: Asian Fusion
- Diet: Vegetarian
Ingredients
For the Mochi Shell:
- 1 cup glutinous rice flour (mochiko)
- 1/4 cup cocoa powder (for dusting)
- 3/4 cup water
- 1/4 cup sugar
For the Milk Tea Filling:
- 1/2 cup milk (dairy or non‑dairy)
- 1 tsp black tea leaves (strong brew or 1 black tea bag brewed and cooled)
- 2 tbsp sweetened condensed milk
For the Boba Pearls:
- 1/2 cup cooked tapioca pearls (prepared according to package)
- 1 tbsp brown sugar or honey (to coat pearls)
Instructions
- Prepare boba: After cooking tapioca pearls, toss immediately in brown sugar or honey. Set aside.
- Make milk tea: Brew strong black tea, mix with milk and condensed milk, then chill completely.
- Cook mochi dough: In a bowl, whisk glutinous rice flour, sugar, and water until smooth. Microwave 1 min, stir, then 1 min more until thick and sticky.
- Shape mochi shells: Dust work surface generously with cocoa powder. Transfer dough, flatten to 1/4″ thickness. Cut into 8 circles.
- Fill mochi sandwiches: Place a spoonful of chilled milk tea filling and 3–4 boba pearls in center of each circle. Carefully pinch edges closed, sealing into a neat sphere.
- Dust and serve: Roll filled mochi in cocoa powder. Refrigerate 30 minutes before serving for best texture.
Nutrition
- Serving Size: 1 mochi
- Calories: ~110 kcal
Keywords: #bobamochi #milkteamochi #bobalovers #chewydessert #bubbleteafusion #japanesedessert #trendydesserts #cocoamochi #sweetfusion #homemadetreats #quickdessert #noovenneeded #chewygoodness #pearldessert #mochirecipes #creamymochi #asiafusion #biteSized #dairyalternative #snacktreats